How to Design a Wavy 3D US Flag in Vectric in 4 Steps
Want to make a 3D wavy American Flag with your CNC?
Here’s an easy 4-step process on how to create a 3D US Flag model. This tutorial uses Vectric Aspire design software.
Follow along with this video for a detailed walkthrough of the project! Follow Laney Shaughnessey on SpindleTV for Vectric tutorials and live weekly classes.
Download Project Files:
Vector Files (.svg and .dxf) of 2 PERFECTLY Proportioned Flags (Current constitutional Flag and 1776 Betsy Ross Flag) The flag vectors are scalable (Keep the aspect ratio) and will give you a good head start without having to create the vectors from scratch.
1. Set Up Your Work Area for your 3D Flag
Start by completing your Job Setup. Depending on your project and material, fill in the job type, size, Z Zero Position and so on. You can use the machine bed for the Z Zero Position, and the center or any of the four corners of your material for the XY Datum Position.

Setting up the work area
In this case, we'll be working on a single-sided model with a 24 1/4-inch-long, 15-inch-wide, and 3/4 inch-thick board. Since we’re creating a 3D model, the Resolution should be set at Maximum for the best results.
At times, you may only see the first three options available – Standard, High, and Very High. To gain access to higher resolutions, simply hold the Shift key as you click on Create a New File.
2. Design the Components of your US Flag Carving
Next, it’s time to add the components.
There are three main components in a 3D US Flag – the flag base, the stars, and the stripes. Any additions such as text, emblems, and ripples are optional, but we’re going to teach you how to add those later on.

Creating stars step-by-step

Want to start a CNC wood carving business from home?
Download our 18-page guide packed with tips and advice from successful customers who have already made it happen.
Take the first step towards turning your passion into a profitable business!
Create Your Stars
On the Create Vector section at the left, select the most appropriate tool. In this case, we’ll select the Draw Star Tool. Type in the number of points your star should have, the inner radius percentage, and the outer radius percentage.
Then, click Create and your first star should appear on your page.
Click on the star and check whether the dimensions match your preference and modify as you see fit. Just make sure to tick the Link XY checkbox to keep it proportional.
Next, duplicate your star using the Array Copy tool under the Offset and Layout section.
For the flag, you’ll need 9 rows and 6 columns of stars and each should be one seat apart from the next, but right below the row above it.

Duplicating stars step-by-step
To do so, type in your star’s size on the X under Gap on the left and type in a negative on the Y (e.g 0.0948). The Row/Column Displacement should also be the same as the star’s size to keep them aligned.
Click on Copy and you should now have a star field. Don’t forget to delete the excess stars!
Connect with Digital Wood Carver
After that, you can now create the rectangular border and the stripes using the Draw Rectangle tool under Create Vector.
Repeat the whole process and adjust as needed using the Alignment Tools available.
For a step-by-step process on how to create each component, you can check out Laney’s Tutorial Video.
How to Add Ripples in your 3D Flag
If you want a ripple effect on your flag, then there are two ways to proceed – choose among existing wave options or create one from scratch.
To view the existing ripple wave options, you can click on the drop-down list beside 3D View and see if anything fits your taste.

How to add ripples to your flag
If none of them does the trick, then you can opt to do it manually. Select the Line tool and draw the rails and the curve. Edit the nodes if needed, and go back to the Two Rail Sweep tool. Select the two rails, and click on Use Selection under Drive Rails. Then, select the drawn ripple wave and click on Apply.
Now you have a manually designed ripple and can view the project in 3D view. Edit as much as you need until you’re satisfied!
How to Add Text to your 3D Flag
If you want to add text into your project, select the Create Text tool on the Drawing Section and type in the word or phrase you want added.
Pick a typeface, adjust the size, and drag the text on the desired position.

Add text step-by-step
Then, add a border using the Create Fillet tool and pull the nodes as close to the text as possible. Then, clear excess vectors inside the boundary and model the text.
How to Add Emblems to your Wooden Flag
Another component you can add are emblems or seals. A common issue that you may encounter while attaching your seal is that the stripes cut through it too like the image below – which we don’t want.
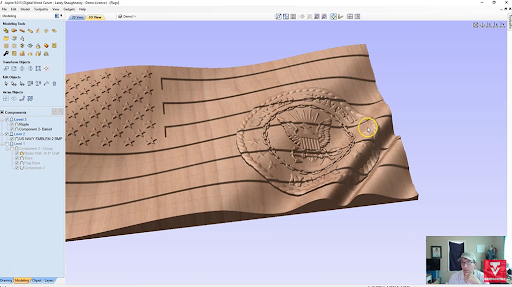
Add shapes and emblems step-by-step
To fix this, click on the Trim tool under the Edit Objects section. Then, click on the outline of your seal and select Clear Inside Boundary to clear up the vectors within the outline.
After this, you can adjust the gaps once more and model your seal without the stripes cutting through!
3. Model the Flag’s Components
After designing the components, it’s time to begin modeling.

Start off by drawing a rectangle over the entire project. Then, on the Modeling menu, click on Create Shape and set a base height depending on the thickness of your material.
At this stage, you can choose between a curved, prism, or flat profile but we’ll stick to a flat profile for now.
As soon as the base is done, you can now add more components using the same method.
For the stars, just drag and select the stars, create shape, and type in your desired base height.
You can also decide how you want one component to be combined with others. You can have them protruded or recessed.

Next, you’ll want to add a Draft to all of your components to give the walls more angle and smooth out edges.
To do so, you’ll just have to select all components, select Add Draft under Modeling Tools, set it to around 30 degrees and apply.
Make sure to monitor your project using the 3D View to make sure you’re getting what you want!
4. Preview the Tool Path for your 3D Flag Carving
If you’ve already created all the desired components, then you can now create the Toolpath for the model.

Click on the Toolpath button beside Model on the upper left corner and select 3D Model Cut. If possible, create a rough cut beforehand.
Then, check your Material Setup and make sure nothing is out of proportion. Make sure to leave a bit of space around the boundary using the Offset tool.
After the calculation is done, you can now Preview the Toolpath and get your machine running!
And that sums it up! Hopefully, this guide has given you a better idea on how the whole design process works and how to use Vectric Aspire.
For a more detailed run-through of the process, you can watch Laney’s 3D US Flag Model on his SpindleTV YouTube channel.
---
Don’t miss out on bi-weekly live tutorials on SpindleTV where you can follow along and ask questions as Laney takes you through all kinds of designs.