
Let’s Design a VCarve Sign – Vectric Tutorial and Sign Designing Tips Part 2
With a combination of a high-quality CNC plus versatile design software, the sky’s the limit when it comes to sign designing.
To continue from where we left off in Sign Designing Tips Part 1, we’ll go over some other software tools that beginners and intermediate-level carvers can use for their next CNC masterpiece. This includes distortion, welding, node editing, and so on!
For this article, we’ll be walking you over two out of the five sign designs Laney created on his LIVE tutorial. But if you want to follow through with all five designs, check out the tutorial video with Laney Shaughnessey on SpindleTV.
Don’t forget to hit the SUBSCRIBE button to keep up with our bi-weekly LIVE Vectric classes!
How to Make a VCarve Welcome Sign
The first design is a simple and homey VCarve welcome sign. Perfect for beginners, this design is not as complicated as most and is great for those who want to master sign designing principles.
1. Designing the Vectors
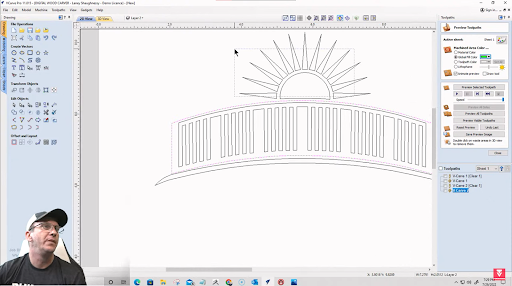
This design will have two main vectors – the bridge and the sun. We’ll go for an image of the sun peaking over the bridge, followed by a Welcome text right below.
Creating the Bridge
To start, set up your project and create a rectangle using the Draw Rectangle tool. Keep it centered using the Alignment tools. Then, you’ll need to create a row of smaller rectangles inside the bigger rectangles using the Array tool.
Then, draw another rectangle that overlaps with all the inner rectangles, making sure that it’s still inside the bigger rectangle. Remove some of the extra rectangles as preferred. In our case, we’ll remove some rectangles within to give a better image of a railing.
Here’s what it should look like:

Now, we’re going to put the inner rectangles together using the Weld Tool.
All you have to do is select all the inner rectangles and select the Weld tool under the Edit Objects menu. This will merge the rectangles, creating a comb-like vector.

Next, select all vectors and click on Distort Object. Tick the Bounding Box option, and Apply. Right-click on the upper line of the vector and turn it into an Arc. Drag to your desired level, and do the same for the bottom line of your vector.
We’ll also create a hillside where your bridge is perched on. We’ll do that by drawing a thin rectangle right below the bridge. Then, using Node Editing Mode, let’s turn both the upper and lower walls of the rectangle into an arc so it follows the bridge. We’ll also turn both ends into a Bezier Curve so that it gets curved.
After that, it should look like this:

Creating the Sun
Now that we have the bridge ready, it’s time to create our sun.
For our sun, we’ll be using the Draw Star tool and creating a star with 25 points. Drag that star in place and draw two circles at the center with the outer circle going a bit beyond the rays, creating an outline.
Then, using the Interactive Vector Trim tool, we’re going to remove all the unwanted vectors between the two circles and between every ray.

Then, we’re going to cut our sun in half by drawing a horizontal line at its center and deleting everything that you won’t need at the bottom. So you’ll end up with a half sun.

To make sure that the sun sits perfectly on top of the bridge, we’re going to ungroup the bridge vector and create an offset of the outermost outline. Then, we’re going to drag the sun down so it aligns with the offset. To finish off, we’re going to cut the excess vectors.
2.Adding the Texts
Now that the vector is ready, let’s add some text. For us, we’ll type in a simple “Welcome”, but for you, it can be anything under the sun. Literally!
To give our text some spice, we want to make the letter “W” and the last letter “E” a bit larger than the others and distort the letters in the middle.
Let’s start with distorting first. First, we’ll click on the Distort Object Tool and Insert a point in the upper left corner of the first “E” and another point in the upper right corner of the letter “M”. Right-click on the line between the two points you just created and turn that into an arc. Then you drag it down and adjust the positioning until it looks good.

To work on every letter independently, right-click on the text and Convert it to Curves. This way, you can ungroup the letters and work on each separately.
Now, you can enlarge the letter “W” and “E” to whatever size you prefer. You can also drag down a guideline to use as a reference and to keep both the same size. You can add as much text and vectors as you’d like. If not, the end product should look like this


Want to start a CNC wood carving business from home?
Download our 18-page guide packed with tips and advice from successful customers who have already made it happen.
Take the first step towards turning your passion into a profitable business!
3.Set Up the Toolpath
When you’re all good with your design, then we’re ready to VCarve our design. Our toolpath will have ⅛ of an inch Flat Depth and End Mill and a 60-degree Vbit. Then, we calculate and preview the toolpath.

You can play around with the toolpaths and vectors as much as you like (you can even add colors!) and when you’re satisfied, you can go ahead and run your CNC machine.
How to Make a Song Lyric Sign
Now let’s hop into something perfect for anniversaries, weddings, and family reunions — a Song Lyric Sign!
This design isn’t just meaningful, but it’s stylish and not to mention romantic. The best part? It’s easy and fun to create! Just follow these four simple steps, and your design should be ready in no time.
Connect with Digital Wood Carver
1.Add the Lyric Background
To start this design, we first need to create the lyric background. We want to create the illusion that it’s behind the text (or vectors) we’ll design later so it needs to be set up in place.
For this project, we’ll be using an 11 ¼-inch by 22-inch board. Then, type in any song lyric that you want on the Create Text Tool and center it on the board using the Alignment tools. For us, we’ll work on the lyrics of Amazing Grace by John Newton with the typeface Monotype Corsiva.

2.Add the Front Text
After creating your background text, it’s time to lay over your preferred text. If you want, you can even challenge yourself with traced vectors instead. But for practice, some laid-over text looks just as nice.
Going with the text-over-text design, we want the title “Amazing Grace” over the lyrics. We’ll use the typeface Times New Roman to emphasize it better and we’ll set it right in the middle of the board with the alignment tools.

3.Clear Unwanted Vectors
To achieve that illusion where the title sits in front of the lyrics, we need to clear the vectors inside the words “Amazing Grace”. Hence, we’ll do the same process as we did in the Vectric Tutorial Part 1 with the eagle and shield with slight adjustments.
Offset the text outwards to 1/16-inch and tick the Select New box. This way, the offset boundary is automatically selected. Select the background text followed by the boundary, then Clear Inside Boundary using the Trim Objects tool.
Note: Always select what you want to trim first before selecting the boundary you want to trim to.
After clearing the vectors, you can now delete the offset created earlier to leave a space between your front and background texts.

4.Set Up the Toolpath
Now that you have the design, you’re ready to set up your toolpaths.
Using the VCarve Toolpath, we won’t use a Flat Depth or a Clearance Tool for this project. Instead, we’ll just use a 90-degree Vbit. Calculate and preview the toolpath and when satisfied, then you’re good to go!
Here’s the final product of our Amazing Grace song lyric sign:

And that sums it up! Hopefully, this guide has given you a better idea on how the whole design process works and how to use Vectric Aspire.
Sign designing has never been this easy! These are just two out of five designs featured in Laney’s tutorial video. If you want to learn the rest, check out Let’s Carve a VCarve Sign Tutorial Video Part 1 and Part 2.
---
Don’t miss out on bi-weekly live tutorials on SpindleTV where you can follow along and ask questions as Laney takes you through all kinds of designs.