3 Unique Wall Art Concepts and Ideas | A Vectric Tutorial
Running out of cool CNC project ideas? Let us introduce you to three unique wall art concepts that you may have never heard before!
In this tutorial, we’ll walk you through three wall art ideas to spice up your CNC projects—Silhouette wall art, Three Panel wall art, and Parametric wall art. We’ve also included a quick step-by-step process on how to create the first two concepts using any Vectric Software.
Don’t forget to hit the SUBSCRIBE button to keep up with our bi-weekly LIVE Vectric classes!
Silhouette Wall Art
The first concept that you can explore is silhouette wall art.
As the name suggests, it’s a carved out image of a thing, animal, or person’s silhouette. This creates simple yet elegant wall decor for your home or office.You can carve out your favorite artist’s silhouette, or design your own concept!
How to Create a Silhouette Wall Art with a CNC
1.Create a Design
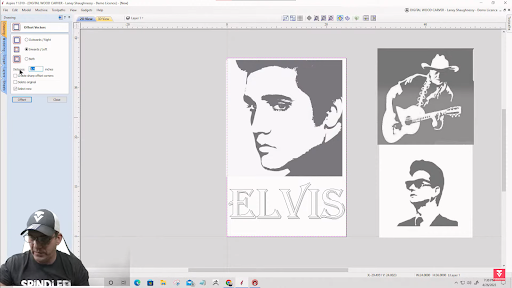
Import your chosen silhouette image onto your job setup. You can play around and add designs and text as desired. Then, you create a rectangle over the entire project and offset it inwards to create a border for your design.
2. Trace Bitmap
Now you have to turn the image into a vector. To do that, you need to use the Trace Bitmap tool and decide whether to use Color Tracing or Black/White Tracing.
Color Tracing will ask you to tick all the colors you want to fill in. So for a black and white image, you’ll want to tick the gray shades as well to make sure it catches as many details.

On the other hand, the Black/White Tracing will convert your image into a purely black and white image. Then, all you need to do is adjust the slidebar until you achieve your desired amount of detail.

Lastly, you adjust the Corner Fit and Noise Filter to either sharpen the image or leave more room for carving as preferred. To check for any unwanted lines or tiny areas, you can always turn the image layer off to view the vector as it is.

Want to start a CNC wood carving business from home?
Download our 18-page guide packed with tips and advice from successful customers who have already made it happen.
Take the first step towards turning your passion into a profitable business!
3.Create a Pocket Cut Toolpath
Select your vectors, text, and border and open the Pocket Cut toolpath. You can do a shallow or deep cut depending on your preference.
However, ideally you shouldn’t cut deeper than ⅛-inch. Opting for a shallow cut will give your wall art a sleeker look! Otherwise, you might lose the visualization and end up with just really deep holes. We’ll also use a combination of a ¼-inch, ⅛-inch, and 1/16-inch end mill to highlight as much detail as possible.

Calculate the toolpath and review the toolpath for every end mill to check if everything looks good. If yes, then you’re ready to go!
Three Panel Wall Art
If you want to create something large that would sit nicely behind the couch or on a large vacant wall, then you can also create a three panel wall art.
Connect with Digital Wood Carver

A three panel wall art is made up of three separate panels that are either arranged vertically or horizontally. It’s perfect for those with large CNC machines as you can just run the project in one sitting. Alternatively, you can carve it per panel if you have a smaller machine.
How to Make a Three Panel Wall Art with a CNC
Create a Design

Like how you start any project, create your preferred job setup and add in some images, text, and a border.
2. Trace Bitmap
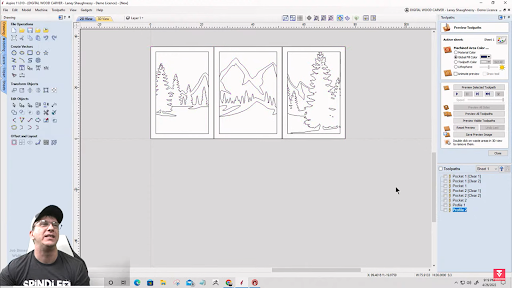
Open the Trace Bitmap Tool and select Black/White Tracing. Drag the slidebar to a 0.75 threshold, and adjust the Corner Fit and Noise Filter as desired. Turn off the image layer, and you should have a traced vector of your design.

Now, with this type of design, the outline of the trees, mountain and the border will be the wood area—everything else will be carved away.
If you want a more unified look, you can size up the vector image at the center so it intersects with the border. Then, you clear all vectors outside the border, this way, the border becomes a part of the vector design!

3.Split into Sections
Now you can always proceed to creating the toolpaths if you think the design already looks good. However, since we’re creating a Three Panel Wall Art, we need to divide the design into three sections.
To do this, all you have to do is create a rectangle over the entire design, which will serve as your boundary, and another 2-inches-wide rectangle as the divider. This leaves room for the CNC to cut through the middle of the dividers.

Hold down the CTRL key, and copy the rectangle so you have two of them. Select the two dividers and the boundary and space them equally horizontally using the Alignment Tools. This way, your panels are exactly as large as the other.
Using the Scissors tool, cut out the unwanted vectors. Then, you’ll want to draw another rectangle over each panel design, offset it outwards by 2-inches to get that perfect panel border and group them together. Do this for all three panels so you’re left with three panel designs.
Then, move the first panel to the left by 1.06-inch to leave a gap between the first two panels. Do the same for the third panel, but towards the right.
Now you’re ready to create your toolpath!
4.Create a Profile Cut Toolpath

To finish up the design, select all vectors and cut inside the vectors with a depth of ¾-inch using a ⅛-inch end mill. Calculate the toolpath, and you should now have a perfect design for your three panel wall art!
Pro Tip: Always use an end mill that can cut through your material.
Parametric Wall Art

Last but not least, we have the Parametric Wall Art.
Parametric wall art is one of the most popular styles of wall art. They come in sophisticated parametric wavelength designs and they look good in almost any type of space.
For this reason, there is a pool of buyers willing to spend for these types of wall art. They can cost hundreds to thousands of dollars, yet are generally simple to make. This makes them a great ‘money-maker’ for CNC enthusiasts!
What is Parametric Wall Art Made of?
Parametric wall art are made out of wood. You can use MDF, plywood, or solid wood. Parametric designs can be created with the Vectric Aspire software. Alternatively, you can also purchase cut files from artists like ParametricArtWood on Etsy.
A small investment of $15-16 and you can earn a few hundred dollars from your works!
Unlike the previous two wall art concepts, you can only create a Parametric Wall Art design with Vectric Aspire. For a quick runthrough of how to create a Parametric design, you can view Laney’s quick tutorial by the end of the Wall Art Concepts and Ideas session.
For a more proactive and full step-by-step walkthrough on how to work around the three different wall art ideas we introduced, check out Laney’s LIVE Vectric Tutorial on Wall Art Concepts and Ideas.
Don’t forget to like and Subscribe to the SpindleTV channel to keep up with the latest updates and to join our LIVE Vectric classes every other week.